Wednesday, April 18, 2012

China Glaze Magnetix Swatches

As you may remember I won a giveaway over at Carinae L'etoile's Polish Stash and received the entire China Glaze Magnetix collection! For me there was quite a learning curve to getting these to work out and I actually started swatching them and then stopped and gave up from frustration! But I decided to give them another go and I'm glad I did!

First off: WHY ARE MY NAILS SO CURVY!!! LOL! For starters my index fingers are more like talons once they start to get some length and this made it nearly impossible to get a design to cover my entire nail >.< You can see the ledge where you can rest your nail at the cuticle as a guide and so as to not touch the magnet. Every time I tried to twist me nail up to get the end half of my index finger I kept whacking it against the magnet :(

Middle Finger
Index Finger

Then on top of that my nails are very curved so I usually get a strip of the design down the centre of my nails but no designs on the sides O.o It's very frustrating but I just decided to be happy with the design that did show up because it still looked awesome - just not as good as if I had flat nails.

Terribly blurry photo! Oh well just to show how "curvy" my nails are


Magnet

Top of Magnet
 You can see the three different designs that the magnet has: a chevron, a star and a diagonal pattern.

Bottom of Magnet
On the bottom near each magnet there is a spot to rest the cuticle of your nail on to stop your finger touching the magnet. I found it easier to rest the magnet further back than my cuticle.

Bottom of Magnet showing the ledges


Instructions

The magnet comes with a set of instructions:
  1. Choose desired magnetic design.
  2. Apply base coat.
  3. Apply one coat of Magnetix Nail Lacquer.
  4. Immediately hold magnet over damp nail. Hold close without touching for 5-10 seconds.
  5. Once nails are designed and dry, seal with a top coat
TIP: Keep magnet clean. If lacquer gets on magnet, wipe off immediately. To achieve different looks, alternate magnet design and/or rotate magnet.

I don't do it that way :) I applied one coat to all fingers and then waited for them to dry. Then I add a second coat one nail at a time and then place the desired design over my nail for 5-10 seconds. I have since noticed that it is better to hold the magnet for longer because as it dries the design will "settle" blurring your lines when you apply a top coat. So if you hold it there for longer as it dries then there will be less settling and the design will stay crisp.


Each of these swatches is without a base or top coat. All photos are in artificial light.
All swatches are two coats.


Pull Me Close


Pull Me Close is a gorgeous intense blue/black colour magnetic. I used the diagonal design for this one. The design turns out very dark on this colour and the intensity of the effect was high. Pull Me Close was opaque with one coat but I did two because I use one for a base coat and the second coat to develop the magnetic design. This was the first colour I swatched and I didn't want to take it off to do the others! I even got the design to appear on my index finger by "rocking" the magnet backwards and forwards lol!


Attraction


Attraction is a grey/black with sparkly silver. I used the chevron design on this one. I would say the effect of this one is about medium in intensity. I was surprised to see the silver sparkle in this one.


Instant Chemistry


Instant Chemistry is a dark/vampy purple. This one was also an easy one coater but I used two. Oh star pattern how I despise you lol! Using the star pattern was a lesson in frustration! I didn't even attempt to get a proper design on my index finger what with it being so curved I knew it didn't stand a chance. And see the poor half star on my pinkie finger *eeekk*! However, this colour works great with the other designs (see TIMING pictures) it's just the star magnet that didn't like me :( The effect of the magnet was low in intensity.


Drawn To You


Drawn To You is a light and dark purple magnetic. Lol my poor index finger! I really liked this one even though it seems more delicate than the others so far. This one also has a gorgeous pink sparkle to it.


You Move Me


You Move Me is a gold/brown with silver magnetic. Aww my poor index finger again! You can see that I touched my index finger to the magnet - stupid talon nail >.<  This one is very much on the sheer side and I would recommend either three thin coats or use a base coat before apply one coat for the magnetic effect. I think I'll try this one over black at some point :)


Cling On

  
Cling On is a brown/olive with silver magnetic. Ok so I admit to having a giggle when I read this one being an avid Star Trek fan! This one gave me flashbacks to me and my family (also Trekkies) calling each other petaQ and saying Qapla' - not to mention the Klingon Drinking song :) Any who, the star magnet worked out better for this one. The magnet seemed to have a stronger effect on the sheer magnetic polishes. I also plan on trying this one out again with an appropriate base colour.


Timing

I wanted to see the difference for the 5-10 seconds for exposure and to compare the effect for a one coater to a several coats polish.

Using Instant Chemistry - two coats and to make up for the terrible swatch

Exposed for 5, 6 and 7 seconds
Exposed for 8, 9 and 10 seconds
You can see the difference between holding the magnet for 5 seconds to holding it for 10. The lines are much more crisp when exposed for 10 seconds compared to the 5 second exposure. For this opaque polish the area between the design becomes darker the longer the magnet is applied.


Using Cling On - two coats is still too sheer

Exposed for 5, 6 and 7 seconds
Exposed for 8, 9 and 10 seconds
Again much crisper lines when exposed for the 10 seconds. Since this one is so sheer you can really see the sheer "jelly" brown in between where the design was formed.


Overall

 I definitely think these suit short nails the best! As you can see from the swatches from Scrangie and The PolishAholic, the designs seem to turn out better on smaller nails since you're not missing half the design down your long nails. I definitely can't wait to wear these once my nails are shorter although I personally don't think the diagonal and chevron patterns turned out too bad.

The diagonal pattern gave the crispest design followed by the chevron. Lastly the star pattern produced a blurred design. I found the star pattern to be the hardest to work with but I would try it again with shorter nails.

You Move Me and Cling On are on the sheer side and would require either three coats or one coat over a base colour. My favourites of the collection are Pull Me Close and Instant Chemistry.

Monday, April 16, 2012

My First Splatter

Ok be nice to me I'm very delicate Lol! This was my first splatter manicure. I used the Snow White manicure I had on which I thought was a good idea since I got to test different base colours. I stuck with using the three colours - red, white and black.

I practised using the straw SO MANY TIMES!! It took me quite awhile to get a design to show up on the paper I was using and I found that it was best if I put the straw deep into the polish and then used one hard blow *giggles*.

The colours I used were Revlon Revlon Red, Revlon White On White and BYS Black Satin. On my red nails I used white and black, on my black nails I used white and red and then on my black nails I used red and white. I started with the darkest colour first and worked up to the lighter colours. Oh yeh and I taped all around my nails before I began and it was a good thing that I did since it makes a big mess!

My left hand worked out much better than my right hand which I did first. I had several fails on my nails but it was too late to fix them - see index finger on right hand *eek*. Unfortunately I only have pictures in artificial light because it was raining and I didn't get a chance to take any pictures outside.

So my left hand :) I like all the designs on my left hand except for my middle finger O.o

Left Hand Red, White and Black Splatter in Artificial Light

Now onto my right hand "hangs head in shame". This was the hand I did first and before I improved. I only like my middle and ring fingers. When doing the white for my index finger it just blew into a big blob :(

Right Hand Red, White and Black Splatter in Artificial Light
 
I definitely need a smaller straw. I used "regular" sized drinking straws that I got from Coles but I think it would be better to use those little juice box straws to get a better "splatter".  I'm not sure if I'll try this again, maybe if I get a smaller straw because otherwise it seemed like there was too much nail polish going on the nail and too much extra wasted.

Weekly Giveaway Round Up

Let's start things off with a bang!

 
First prize is:
  •  Bracelet donated from GingerKittyDesigns. You choose the colours from her list of polish.
 Second prize is:
  •  Lynderella "The Glittering Crowd"
  Third prize is:
  •  Set of 8 mini's from SoFlaJo from her new Happy Hour Collection.
 Fourth prize is:
  • A-Englands Bridal Veil
  • Hits Mari Moon Multichrome Darling 
  • UpColors Flocado Viagem a 2
  Fifth prize is:
  • Lemon Sugar Scrub
  • Polish Holder
  • Nail Stickers
  • Impress Nails
  • Out The Door mini top coat
  • Sally Girl Mini Cuticle Oil
  • Orly Nail Rescue
  • Sally Hansen Nail File
Sixth prize is:
  • Lacquer Convention Pop Tart
  • Lacquer Convention Observatory
  • Lacquer Convention Galinda
Seventh prize is:
Eighth prize is:
  •  Polishes by Girly Bits. You can pick 5 polishes total from the one's released previously and/or from the Newest Calendar Girls Collection - May, June, Julyx2 and August
Ninth prize is:
There will be 9 WINNERS! Fingers crossed everyone! This giveaway is open internationally and ends 1st May 2012 at 12.01am EST. To enter click HERE.


 The prizes are:
  • Koh Bohemian Chic
  • Koh Grungy Touch
  • Koh Wipe It Away Nail Polish Remover
  • Koh Purifying Hand Bath Tablet
There will be one lucky winner! This giveaway is open internationally and ends 18th April 2012. To enter click HERE.


 The prizes are:
  • Hello Kitty Nail Polish
  • Hello Kitty Diamond gloss
  • Hello Kitty Duo Eye Shadow
  • Hello Kitty Mirror Compact
  • Hello Kitty Makeup Sharpener
  • Hello Kitty Retractable Powder Brush
There will be FIVE lucky winners! This giveaway is open to Australian residents only and ends 17th April 2012 at 10pm AEST. To enter click HERE.


 The prizes are:
  • 0.6 fl. oz. Butter London Nail Foundation Flawless Basecoat
  • 0.6 fl. oz. Butter London Hard Wear Pretty Darn Quick Topcoat
There will be one lucky winner! This giveaway is open internationally and ends 17th April 2012 at 1pm PST. To enter click HERE.


 The prizes are:
  • MAC Viva Glam Nicki Lipstick
  • Essie "My Perfect Pair" Polishes Braziliant & Super Bossa Nova (size = 5ml each)
There will be one lucky winner! This giveaway is open internationally and ends 25th April 2012 at midnight EST. To enter click HERE.


 The prize is:
  • Wet n' Wild Color Icon Ice Baby Collection (Holiday 2011)
There will be one very lucky winner! This giveaway is open internationally and ends 5th May 2012. To enter click HERE.


 The prizes are:
  • 2 China Glaze GR8
There will be TWO very lucky winners each of whom will receive a bottle of China Glaze GR8. This giveaway is open internationally and ends 25th April 2012. To enter click HERE.


 The prizes are:
  • China Glaze Hunger Games Collection: Stone Cold
  • Milani Spring 2012 Collection: Orchidia
  • OPI Holland Collection 2012: I Have a Herring Problem
There will be one lucky winner! This giveaway is open internationally and ends 18th May 2012. To enter click HERE.


 The prizes are:
  • Ciate Jewel
  • Models Own Indian Ocean
  • Models Own Beetlejuice Mini Set
  • Max Factor Fantasy Fire
  • Topshop Razzmatazz
There will be one lucky winner! This giveaway is open internationally and ends 23rd April 2012. To enter click HERE.


 The prizes are:
  • Revlon Lip Butter in Macaroon
  • Barry M Lipstick in Pink Ribbon
  • Collection 2000 Shimmer Shades in Blushalicious
  • MUA Eyeshadow Palette in Starry Night
  • Accessorize Nail Polish in Bronze
  • ELF Shimmer Pencil in Black Bandit
There will be one lucky winner! This giveaway is open internationally and ends 23rd April 2012. To enter click HERE.


 Prize 1 is:
  • OPI Catch Me In Your Net
  • A pair of handmade stud earrings using OPI DS Original and a dark purpl
Prize 2 is:
  • Cult Nails Toxic Seaweed  
  • A pair of handmade stud earrings using OPI DS Shimmer and Zoya Ali 
There will be two lucky winners each of whom will win one of the prize packs. This giveaway is open internationally and ends 20th April 2012. To enter click HERE.


 The prizes are:
  • 2 Revlon's Whimsical 
  • 2 Claire's Candy Shop 
There will be two winners each of whom will receive a bottle of Revlon Whimsical and Claire's Candy Shop. This giveaway is open internationally and ends 20th April 2012. To enter click HERE.


 The prize is:
  • 4 Lynnderella The Bunny Code
There will be FOUR winners each of whom will win one of the above polishes. This giveaway is open internationally and ends 17th April 2012 at 1pm PST. To enter click HERE.


 The prizes are:
  • 2 Finger Paints Flecked
  • Finger Paints Flashy
There will be two winners! One winner will receive Flecked and Flashy and the second winner will receive Flecked. This giveaway is open internationally and ends 22nd April 2012. To enter click HERE.


Deuce Beauties is having a Nicka K New York Nail Colors & Lip Colors Giveaway!

The prizes are:
  • Gold Shimmer, Dolphin, Royal Fuchsia, Violet, and Naples Lip Color
  • Apricot, Lavender, Green Velvet, Ice Berg, and Delray Lip Color
There will be two winners (one U.S. and one International). Each winner will receive 4 nail colours and 1 lip colour.This giveaway ends 20th April 2012. To enter click HERE.


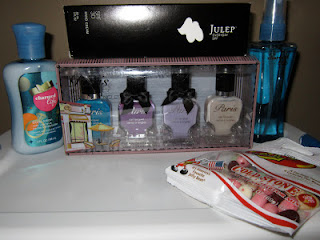
The prizes are:
  • Bath & Body Works Charmed Life Body Lotion
  • Bath & Body Works Charmed Life Body Mist
  • Julep Everyday SPF 30 Hand Cream
  • Paris 4 Set Nail Polish
  • Jelly Belly Mini Bag (Coldstone Creamery Flavors!)
There will be one lucky winner! This giveaway ends 20th April 2012. To enter click HERE.


The prizes are:
  • Full-Size Pansy Yellow Glitter Franken
  • Mini Indigo Purple Shimmer Franken
  • Pansy 3-D Stickers
  • Lisa Frank Mechanical Pencils
There will be one lucky winner! This giveaway ends 18th April 2012 . To enter click HERE.

Saturday, April 14, 2012

Skin White As Snow...

Can you guess where I was going with that? Lol! I wanted to go and see Mirror Mirror since I was in the mood for some campy fun and I quickly did these nails to match.

I was going for something similar and all I could hear playing over and over in my head was:

Skin white as snow,
Lips red as blood, and 
Hair black as ebony!

So I decided to do some mismatched nails using, you guessed it - red, white and black! 

 I applied a base coat of Revlon Calcium Gel Nail Hardener. On my index finger I applied two coats of OPI Black Onyx. On my pinkie finger I applied two coats of Revlon White on White. For my remaining fingers I used two coats of Revlon Revlon Red. Then I finished them all off with a coat of Seche Vite.

Now for the photos:


Snow White Mani in Artifical Light

Unfortunately there wasn't much sunlight in which to take these photos.

Snow White Mani in Natural Light

Then this lone photo in the shade.

Snow White Mani in Shade
 I really liked this :) I know that it's super simple but that was exactly what I was going for!

Thursday, April 12, 2012

Flame Nails

I wanted to attempt the gorgeous flame nails that I have seen popping up in honour of The Hunger Games release. I mostly followed the amazing tutorial here over at Nails by Kayla Shevonne. Although it was extremely easy to follow I need a lot more practice :( I used orange and red for my gradient, instead of just red, and I did the design the opposite way around with the black at the top, instead of the bottom, of the nail.

Although not a step by step since Kayla's tutorial is fantastic I did take photos of each stage just to show what it looked like and to add comments about each step.

First I sponged Ulta3 Mango Mayhem onto almost 2/3 of my nails.


Then I sponged Revlon Revlon Red onto the top 1/3 of my nails.


At this point I would suggest you add a to coat since I found it a PITA to try and draw the outline of the flame on the uneven surface created from sponging the polishes. Then using OPI Black Onyx and a small brush I outlined the flames. Lol sorry got a bit excited and filled in one nail to see what it looked like!


Then I used the OPI brush to added drops of Black Onyx and then used the small nail art brush to fill in the rest of the black. Since the black filled up more of my nail than I had intended I sponged on some more Revlon Revlon Red at the tips of the flames.


Then finally I cleaned up the mess I had made on my fingers and added a thick coat of Seche Vite.

My left hand:
Flame Nails in Artificial Light
Flame Nails in Natural Light

My right hand:

Flame Nails in Artificial Light
Flame Nails in Natural Light
Flame Nails in Shade

If I ever did this manicure again I would try to keep the black higher up my nails as on my left hand the black takes up almost half my nails. Oh and do better flames! Hehe although I suck at nail art this has got to be one of the coolest I have ever done!