Showing posts with label ULTA3. Show all posts

Friday, June 8, 2012

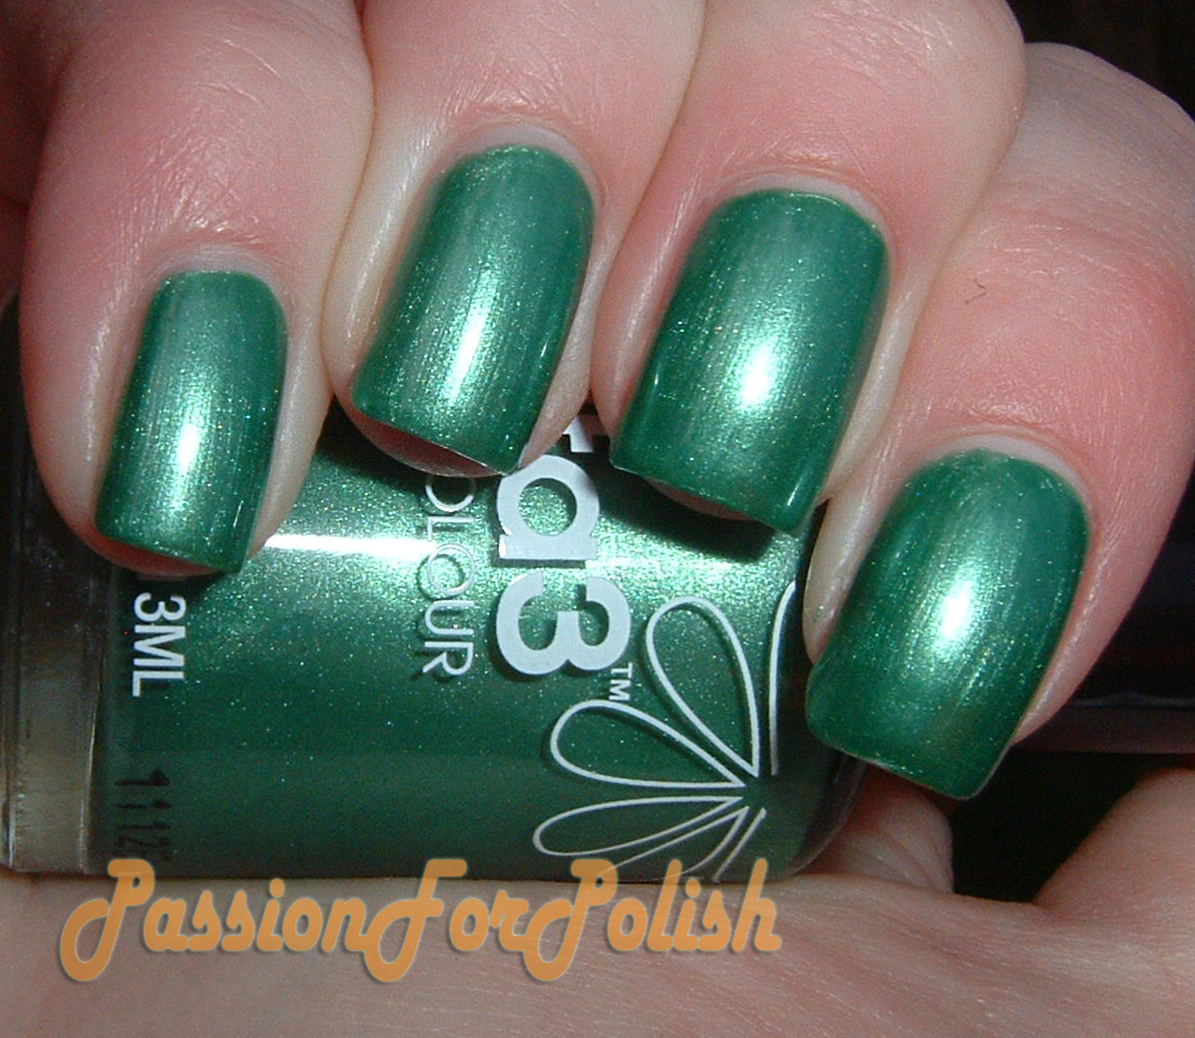
Ulta3 Jade

The story.

I had removed my nail polish the night before but it got to late for me to paint them. The following morning I headed out to the shops with *gasp* naked nails. I finished at the shops and came home to drop off some shopping and decided I couldn't handle it any longer. I gave in and decided to paint my nails  >.<


I used Sally Hansen Triple Strong for my base coat follower by 2 coats of Jade. Although Jade is quite frosty, I found that as long as I kept my hand steady I easily got nice straight lines so the brush-strokes weren't terrible. Jade applied very smoothly, so this Ulta3 was a hit :) Since I was heading back to the shops soon I used OPI RapiDry Top Coat to finish my manicure. I did this mani in about 15 minutes which is quite an achievement for me!


Please excuse any mess as I took these photos before I headed out again :(

Ulta3 Jade in Artificial Light
Ulta3 Jade in the Shade
This is such a gorgeous colour! I swear it's like it glows! All I have to say is that I love this!

Sunday, April 22, 2012

Ulta3 Cocoa

I was changing my nail colour and wanted to match it to a gorgeous dress I was wearing. So that's how I came to choose Ulta3 Cocoa from the Metallic Crush collection. I've shown you swatches of this colour and I loved the gorgeous metallic brown then and I love it now!

I applied a base coat of Revlon Calcium Gel Nail Hardener. This base coat disagrees with several of my polishes and Cocoa was no exception >.< I applied two coats because the first coat did the same 'balding' that I've experienced with other polishes using this base coat. I find Cocoa easy to apply just keep the brush straight! I know that others don't like this collection because they find them too frosty, showing all the brush strokes, but I love them! I finished it off with a coat of Sally Hansen Mega Shine top coat.

So onto the pretty pictures!

Ulta3 Cocoa in Artificial Light
 Then the following morning I took these.

Ulta3 Cocoa in Natural Light
Ulta3 Cocoa in the Shade
Cocoa is such a gorgeous reddish brown metallic! This colour matched my dress perfectly. The thing I loved most was how quickly it dried between layers since it was rather late at night when I finally got around to painting my nails!

Tuesday, April 10, 2012

Ulta3 Lemon Tart

Up next was another from the Ulta3 Gelato collection, this time the yellow creme. Lemon Tart is again a muted yellow creme, not quite a pastel but close.

I applied a coat of Revlon Calcium Gel Nail Hardener as a base coat. Then I applied four - yes FOUR!! - coats of Lemon Tart. Let me just say this polish was one PITA! Argh each layer was streaky and for the last two coats I added much thicker coats in an attempt to finally make it opaque. Application was crazy it was too thick and kept coming out streaky and had the same thick brush that I have encountered from other polishes in the Gelato collection. Then finished with a generous coat of Seche Vite to level out the polish.

So onto the pictures:

Ulta3 Lemon Tart in Artificial Light

Ulta3 Lemon Tart in Natural Light

 
Ulta3 Lemon Tart in Shade
So I like the colour but I HATE the formula on this. The formula on this one was so bad that I think I'll keep it to use in nail art only since I really don't have the patience to do four coats each time.

Friday, March 23, 2012

Ulta3 Blue Heaven

I chose another Ulta3 nail polish from the Gelato collection. This time I chose Blue Heaven, a gorgeous blue creme, since I plan to use it as a base for another polish.

I applied a coat of OPI Nail Hardener for my base coat then followed it with two coats of Blue Heaven. Blue Heaven applied much the same as Mango Mayhem. The brush was still too thick collecting too much polish and the formula was also thick like Mango Mayhem. Again when I finished the two thick layers it was uneven and dried to that same vinyl/semi-matte finish. My bottle also has these solid white particles that I mostly picked up in my first coat so thankfully they were covered with my second coat but no matter how much I tried mixing the contents I couldn't get rid of them :( I applied Sally Hansen Mega Shine top coat and as with mango Mayhem the top coat worked to smooth the polish giving it an even finish *sigh of relief*. I used Sally Hansen Insta-Dri Drops to hasten the drying time of my top coat.

I took these photos straight away that night in artificial light.

Ulta3 Blue Heaven in Artificial Light
The following morning I took photos in the natural sunlight. I'm surprised that you can't clearly see where I whacked my index finger after taking photos the night before. Yay lol!

Ulta3 Blue Heaven in Natural Light
And then this lone photo in the shade :)

Ulta3 Blue Heaven in the Shade

I really love this colour, well blues in general! Blue Heaven is a gorgeous sky blue creme and with a top coat the finish looks fantastic - not bad for a AUD$2 nail polish :) Both the Ulta3 nail polishes I have tried dried very quickly on their own, probably because they dry to that semi-matte/vinyl finish.

Wednesday, March 21, 2012

Ulta3 Metallic Crush Swatches

So I picked up a few of the new Ulta3 Metallic Crush collection and figured I would swatch them :) First of all I wish they had kept the name Molten Metallics, it just sounds so much better than Metallic Crush! But I guess they wanted it to be different from Face of Australia Molten Metallics collection. I didn't pick up Pinot because when I picked up the bottle it looked almost identical to Shiraz and I also didn't buy Burnt Orange because it didn't appear to be a metallic like the others in this collection.

Each of these swatches is without base/top coat. All photos are taken in artificial light.

Jade

This is two coats. Application was good. Jade is a gorgeous jade green metallic. As expected you can see the nail brush strokes but they aren't very defined so it doesn't bother me at all. I love this shade!


Copper

This is two coats. Application was good. Copper is a vivid orange metallic. This one's a stunner! The moment I put it on it reminded me of China Glaze Riveting.

Shiraz

This is two coats. Application was good. Shiraz is a brilliant red metallic. I love this one too! It looks like my nails are on fire :)

Antique Gold

Two coats. The formula on this one was slightly thick and I think that might be why the brush strokes are a bit more obvious. Overall though the formula wasn't anywhere near horrible just a bit thicker than the others from this collection. Antique Gold is a dark gold metallic. I don't have any colours like this in my collection so I like it!


Cocoa

Two coats. Application was good. Cocoa is a brown/bronze metallic. This one was another stunner. I think I only have one other bronze nail polish so I'm happy to have this one it's so pretty!

Enchanted
 

Two coats. Application was good. Enchanted is a dark plum purple with a gorgeous green shimmer. I saved the best until last! Enchanted is absolutely gorgeous! When I picked up the bottle there was an obvious green shimmer to the polish that I desperately hoped came through when applied to the nail AND IT DOES!  Love This!

Stamping

Copper, Antique Gold, Enchanted


I saw people asking about how this collections is for stamping. They all come out very sheer, except for cocoa, so if it's an intense look you're looking for I wouldn't recommend any of these. I tried these with different images and found that ones with small detail didn't work at all so you needed large whole images. If you're using a stamping image without fine detail and after a subtle look these will work. However, I found Cocoa came out really clearly unlike the others.


Overall

I love this collection! I was surprised to fine that the application of these was so good! I have almost no metallics in my collection so I was more than happy to pick these colours up, especially considering how cheap they are (AUD$2.25ea). I was especially happy since the formula on these was so great, except for Antique Gold. My personal favourite of these has to be Enchanted! However, I love the intensity of all the colours, they're absolutely stunning.

Saturday, March 17, 2012

Ulta3 Mango Mayhem

I'm so embarrassed to say that even though I live in Australia this is the first Ulta3 nail polish that I have tried! I picked Mango Mayhem from the Ulta3 Gelato collection. Mango Mayhem is a muted orange creme and the first orange I have tried.

I applied a base coat of OPI Nail Hardener and then two coats of Mango Mayhem. I'll tell you now the brush was a PITA to work with. It doesn't sit flat and is very thick, not broken but fanned out. It made it very difficult to apply the polish because the brush kept picking too much nail polish up at once and I couldn't brush most of it off. To top it all off the formula was very thick which made trying to apply a thin even coat impossible. I was really frustrated when I finished the two coats and some areas were so much thicker than others. It also dries to a vinyl/semi-matte finish which would look OK if the polish applied evenly. I still added a top coat of Seche Vite and was SO HAPPY that I did because it managed to level out the nail polish and give it a shiny finish. With the top coat levelling out the nail polish I loved this manicure!

These photos were taken in artificial light.

Ulta3 Mango Mayhem in Artificial Light

The following morning I took these photos in the natural light.

Ulta3 Mango Mayhem in Natural Light


I have to say I don't think this colour suits me. However, I ADORE THIS COLOUR! I just didn't want to take it off, it is such a gorgeous colour. It's not quite a pastel more a muted orange instead. For AUD$2 I am so happy I finally decided to try Ulta3! And since I'm allergic to mango this is as close as I'm going to get :)