Pages

Thursday, December 29, 2011

China Glaze Dorothy Who?

I wanted to change my manicure to something sparkly in preparation for the New Year. But first I had to remove Glittering Garland which wasn't exactly the smooth removal I had been hoping for. Due to the large amount of microglitter in the polish the removal was a bit more involved that usual. As I was attempting to remove the polish, the left-over microglitter made the surface feel like sandpaper and was determined not to come off. First I tried using Sally Hansen Polish Remover, which I usually use when konading as it doesn't leave a film on my plates, but it barely removed any of the polish. Determined I grabbed my Jessica Nail Polish Remover and tried that instead. Thankfully it was a success and, applying some pressure, Glittering Garland finally came off!

Thinking I wanted something as glittery and sparkly as possible I grabbed China Glaze's Dorothy Who? from the Wizard of Ooh Ahz collection. Dorothy Who? is an intense blue jelly packed with light blue and silver microglitter. To begin with I used Revlon Quick Dry Base Coat followed by two coats of Dorothy Who?. The first coat gives a transparent light blue jelly with microglitter but the second coat gives a vibrant opaque blue jelly base with plenty of microglitter. I had problems with the formula of this polish being on the watery side so I did relatively thin coats in an attempt to control the fallout. I found it frustrating because with the formula being watery I had to use less polish on the brush. Then when I would return with more polish to finish the nail the brush would pull the polish already on the nail as it was quickly drying. So it was a balancing act between working slowly to control the thin polish and working quickly before the polish began to dry. Let me tell you all this trouble was definitely worth it!

I sealed the manicure with a coat of Seche Vite Dry Fast Top Coat to even out the microglitter and then used Sally Hansen Insta-Dri Drops to speed dry it. Then once set I took the following photo's that night under artificial light.

China Glaze Dorothy Who? in Artificial Light

China Glaze Dorothy Who? in Artificial Light
See how perfectly Dorothy Who? translates onto the nails. Not to mention just look at all that mouth-watering glitter! 

The following day I took photo's outside in the blasting summer heat. In 38°C heat the sun was most definitely shining giving me the perfect opportunity to show case the beauty of Dorothy Who?.

China Glaze Dorothy Who? in Natural Light

 China Glaze Dorothy Who? in Natural Light

I bought Dorothy Who? from Nailetc as a single polish order. It took three weeks to get from the US to Australia via First Class Shipping. What I love about Nailetc is that with each order, even if you purchase only one polish like I did, they give you a code for a 10% discount off your next order!

I chose China Glaze Dorothy Who? because I wanted a sparkling sensation, a glitter-bomb, and that's exactly what I got! I am absolutely intoxicated with this colour! It's just so eye-catching and even as I write this I keep finding myself following the sparkling of my nails and stopping to admire them. Distracting but SO worth it! Along with Glittering Garland this has become one of my favourite polishes - shining blue, glittering silver - I ask you, what's not to love!

Monday, December 26, 2011

China Glaze Glittering Garland

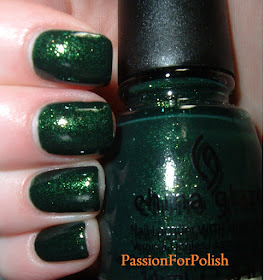
Every since it arrived I've been dying to try China Glaze Glittering Garland from the Christmas Let It Snow Collection. Glittering Garland is a dark green jelly base with yellow/green toned shiny microglitter. When I first saw swatches of it I was reminded of China Glaze Emerald Sparkle which I don't yet have but has been high on my Must Have list.

I had been hoping to wear this one for Christmas but didn't get a chance to change my manicure and so I took the opportunity to try it on now. I applied my usual Revlon Quick Dry Base Coat and then two layers of Glittering Garland. It was opaque with one coat but I decided to put on two in the hopes of longer wear. A coat of Seche Vite Dry Fast topcoat and my favourite Sally Hansen Quick Dry Drops and my manicure was complete!

These are the photo's I took in artificial light that night after completing my manicure.

China Glaze Glittering Garland in Artificial Light

 China Glaze Glittering Garland in Artificial Light


Application was smooth and there was almost no clean up. My only complaint is that I found that once I added a topcoat the microglitter was somewhat muted. However, the full effect of the yellow/green microglitter still came through clearly in the sunlight - but not in my photo's!

The next photo's were take the next day in the natural light. Although the microglitter was shining through like crazy every time I tried to take a photo the glitter wouldn't photograph unless it was blurry.You can get an idea of what the microglitter looks like from the photo's in artificial light.

China Glaze Glittering Garland in Natural Light

China Glaze Glittering Garland in Natural Light


I am an absolute sucker for greens, add glitter and I'm a complete goner! China Glaze Glittering Garland is currently my favourite green, it is just so pretty with all that sparkling green and in the sunshine it is simply gorgeous! If you don't have this one yet in my opinion it is a definite must have.

Friday, December 23, 2011

Chi Chi Glamourama with a Holly Design

I finally got around to doing a design on my Chi Chi Glamourama manicure. I had decided on doing a holly design on my nails and began flipping through my Konad plates. My plans came to an abrupt halt when I realised I didn't own a plate with a holly design. So I decided to improvise and used a nail art brush with Maybelline Express Finish Racy Red to draw the holly berries and then I stamped the leaves from the rose design on Konad plate M25.

Konad Plate M25 from ICNA

I chose racy red because I wanted a vibrant red that would easily stand out against Glamourama. For the berries I used the nail art brush to dab sets of three dots on my nails. Using Konad Special Polish Green, I stamped the leaves using the smaller side of the Konad Double Sided Stamp. Over and over again! If you don't have M25 you can find the same rose design on Konad plate S1, however any leaf design would be fine. I used a coat of Seche Vite to seal the design.

I took these photo's the next morning in the sunshine.

Chi Chi Glamourama with Holly Design in Natural Light 

 
 Chi Chi Glamourama with Holly Design in Natural Light

I love this design! It's so strange because I wasn't a huge fan of Glamourama on it's own but once I added the holly design suddenly I loved everything about it. To me it really screams Christmas and I am so glad I decided to do it!

Wednesday, December 21, 2011

Chi Chi Glamourama

My newest manicure is Chi Chi's Glamourama, a bright gold foil with very small yellow, orange, green and gold glitter.

The application was very smooth and the brush made handling easy. The brush is small because of the bottle size and it is thicker than the China Glaze brushes, although not as wide as the Rimmel brushes. I applied my usual Revlon Quick Dry Base Coat followed by 2 coats of Glamourama. For added shine I used Sally Hansen Mega Shine topcoat to seal my manicure. There was practically no clean up on this manicure the polish was that easy to control. Impatient as ever I used Sally Hansen Insta-Dri Speed Dry Drops.

Since I'm such a night owl I like to see what the polish will look like in both the day and at night. That's why I like to have photo's of my manicures in both artificial light at night and then in natural light during the day. So anyway here are the photo's I took that night in artificial light.

Chi Chi Glamourama in Artificial Light


Chi Chi Glamourama in Artificial Light

Glamourama is actually a light gold than it photographed in the artificial light. Unfortunately unless the picture was blurry the actual colour of the nail polish wouldn't shine through. In the top photo you can just see the small specks of green, orange and yellow glitter flecks.

The following photo's were taken the next morning in the sunlight.

 Chi Chi Glamourama in Natural Light


Chi Chi Glamourama in Natural Light 

I tried to capture the specks of yellow, gold, orange and even green glitter in this polish but they're very small and it was difficult to get the light in just the right angle. You can see flecks of the glitter better in the photo's taken in the sunlight. The top photo in the natural light shows the true colour of Glamourama.

This is the only gold nail polish I own since I'm not a big fan of the colour on my nails and with my skin tone, however I plan to do a Christmas design with the gold as my base colour. So that's all for now until I decide which of the designs I have in mind to do!

Monday, December 19, 2011

China Glaze Holly-Day and M3

Today I decided to add a Konad design to my Holly-Day manicure. I knew that I wanted to add something to my design but wasn't sure whether I wanted to add a glitter top coat, draw a design or stamp a design. In the end I decided stamping would be the easiest way.

I chose the scattered star design on Konad plate M3 to stamp over China Glaze's Holly-Day.

Konad Plate M3 from ICNA

I used the smaller side of the Konad Double Sided Stamper to stamp the design on each nail in Konad Special Polish Gold. I wanted the stars to curve around the top area of my nail and chose to stamp the design in the same location on each nail instead of trying to do an inverted design on the opposite hand. After stamping I applied a coat of Konad Top Coat since I didn't want to risk smudging my design.
 
I waited a few minutes and then took these photo's in natural light.

China Glaze's Holly-Day with Konad M3
 China Glaze's Holly-Day with Konad M3


Although I like this design I think it's a bit subtler than I wanted. The gold stamping was very light, however, when the sun hit the design at a certain angle the gold would really show through. I like the stars but I wish that they stamped brighter like in the second photo.


Saturday, December 17, 2011

China Glaze Holly-Day

I removed my Velvet Bow manicure which went quite well especially considering I had a coat of Seche Vite and a Konad Top Coat to get through. I don't think my nails had ever been so rock hard! I didn't have any staining from Velvet Bow which surprised me since I come to expect it from most dark nail polish colours.

I decided to go with a green for my next Christmas themed manicured and ended up choosing another from China Glaze's Let It Snow Collection. This time I chose Holly-Day, a dark forest green creme. This weekend is new nephews Christening so it seemed like a suitable colour to wear.

As with Velvet Bow the application was very smooth and needed very little clean up. I used Revlon Quick Dry Base Coat followed by two coats of Holly-Day and then topped it all off with a top coat of Seche Vite.

I took some photo's in artificial light after applying the polish that night. At night it appears as a much darker green but still manages to be a gorgeous colour.

China Glaze's Holly-Day in Artificial Light
 
 
China Glaze's Holly-Day in Artificial Light 

The next morning we had actual sunshine so I took the opportunity to take some photo's in the natural light. In the natural light it definitely lives up to its name-sake, a vibrant holly green creme.

 China Glaze's Holly-Day in Natural Light

 China Glaze's Holly-Day in Natural Light


I LOVE this colour! The moment I saw Scrangie's swatch of Holly-Day it immediately jumped to the top of my Must Have List and I must say I am not disappointed. Green's have got to be one of my favourite colours to wear and Holly-Day is no exception!

Thursday, December 15, 2011

China Glaze Velvet Bow and M64

I decided to add a Konad design to my Velvet Bow manicure to make it more festive. So of course when Christmas shopping I managed to scratch off some of my polish whilst looking around Priceline. So I went ahead and stamped my nails with the criss-cross design on Konad plate M64. I can't remember whether I bought this plate from ICNA, a good website for fellow Aussies after Konad items, or KonadNailArt, where I've bought Konad from before .


Konad Plate M64 from ICNA (International Creative Nail Art)

I haven't stamped my nails for some time and must say I am a bit rusty. Most of them weren't too bad except for the thumb of my left hand where I managed to get the design completely on one side. Using the Double Sided Stamper Set I stamped the design on every nail in Konad Special Nail Polish White and then fixed up my manicure where I scrapped off my nail polish. I sealed the design with Konad Top Coat and used the Sally Hansen Insta-Dri Speed Dry Drops to make it dry faster. The only annoying thing about stamping my nails is the long time it takes the Konad Top Coat to dry because it is so thick to stop it from dragging the design. Finally to top it all off I managed to scrape the middle finger of my left hand pulling off my nail polish, stamp and topcoat - FRUSTRATING! This was not one of my best days! I did a bit of a hatchet job to "fix" the finger I ruined by removing the section of top coat and polish I scraped and repainting it. So unfortunately my Konad stamp just abruptly ends on that nail.

Anyway here is the end product, flaws and all! I took this photo in artificial light after stamping it.

Velvet Bow with M64 in Artificial Light

I took this photo the day after I did the stamping and lucky it wasn't as overcast as it has been lately so I at least had some decent light to work with.

Velvet Bow with M64 in Natural Light
I like this design a great deal, to me it looks like a bunch of Christmas presents all wrapped up sitting under a Christmas tree!

Tuesday, December 13, 2011

China Glaze Velvet Bow

As Christmas is quickly approaching I thought it was time I started picking Christmas colours for my nails. Since I recently placed an order with head2toebeauty as a pre-Christmas treat for myself I decided to go with Velvet Bow from China Glaze's Let It Snow Collection their Christmas release. I used head2toebeauty's 5% saving coupon DEC05 which is valid until 31/12/2011 for anyone interested!

I just have to say how happy I was with my order. I ordered almost forty polishes and they were packaged in sets of 3 in China Glaze boxes with a few bits packaging material inside each box.


Then all the boxes were bubble-wrapped together and placed in a shipping box surrounded by more of that packaging material. I had read from others who had ordered from head2toebeauty that they had nail polishes arrive broken (which were later replaced when the customer emailed them) but I am overjoyed that all of mine arrived in perfect condition. So not only were they packaged beautifully but my packaged arrived about 9 days after placing my order! Traveling from the US to Australia, that's pretty impressive, considering the usual snail pace for mail.
 
Anyway now that I've finished gushing over my order on to the nail polish!I used Revlon Quick Dry Base Coat, my go-to base coat since I'm so impatient and it dries so quickly that I can start painting my nails in no time. I applied two coats of Velvet Bow, left it to dry then applied a top coat of Seche Vite Top Coat. As I'm impatient and one of those people who the moment they finish painting their nails manages to knock them against everything I used Sally Hansen Insta-Dri Speed Dry Drops to quickly set my manicure. I am absolutely in love with these drops! Not only does my nail polish dry extremely quickly but within minutes I don't have to worry about denting or scraping my nail polish as the surface has dried. Thankfully these drops don't seem to cause shrinkage from the tips of my nails like other dry drops do. I took the pictures the next day and unfortunately it's been rather overcast so this was the best lighting I could get.


Velvet Bow is a dark wine jelly colour that I absolutely adore! I  must admit I have quite a fondness for these gorgeous burgundy colours and I had no problems with the application, the formula on this was great.

So that was China Glaze's Velvet Bow from their Let It Snow Collection, my first nail polish to start me off into the spirit of Christmas!